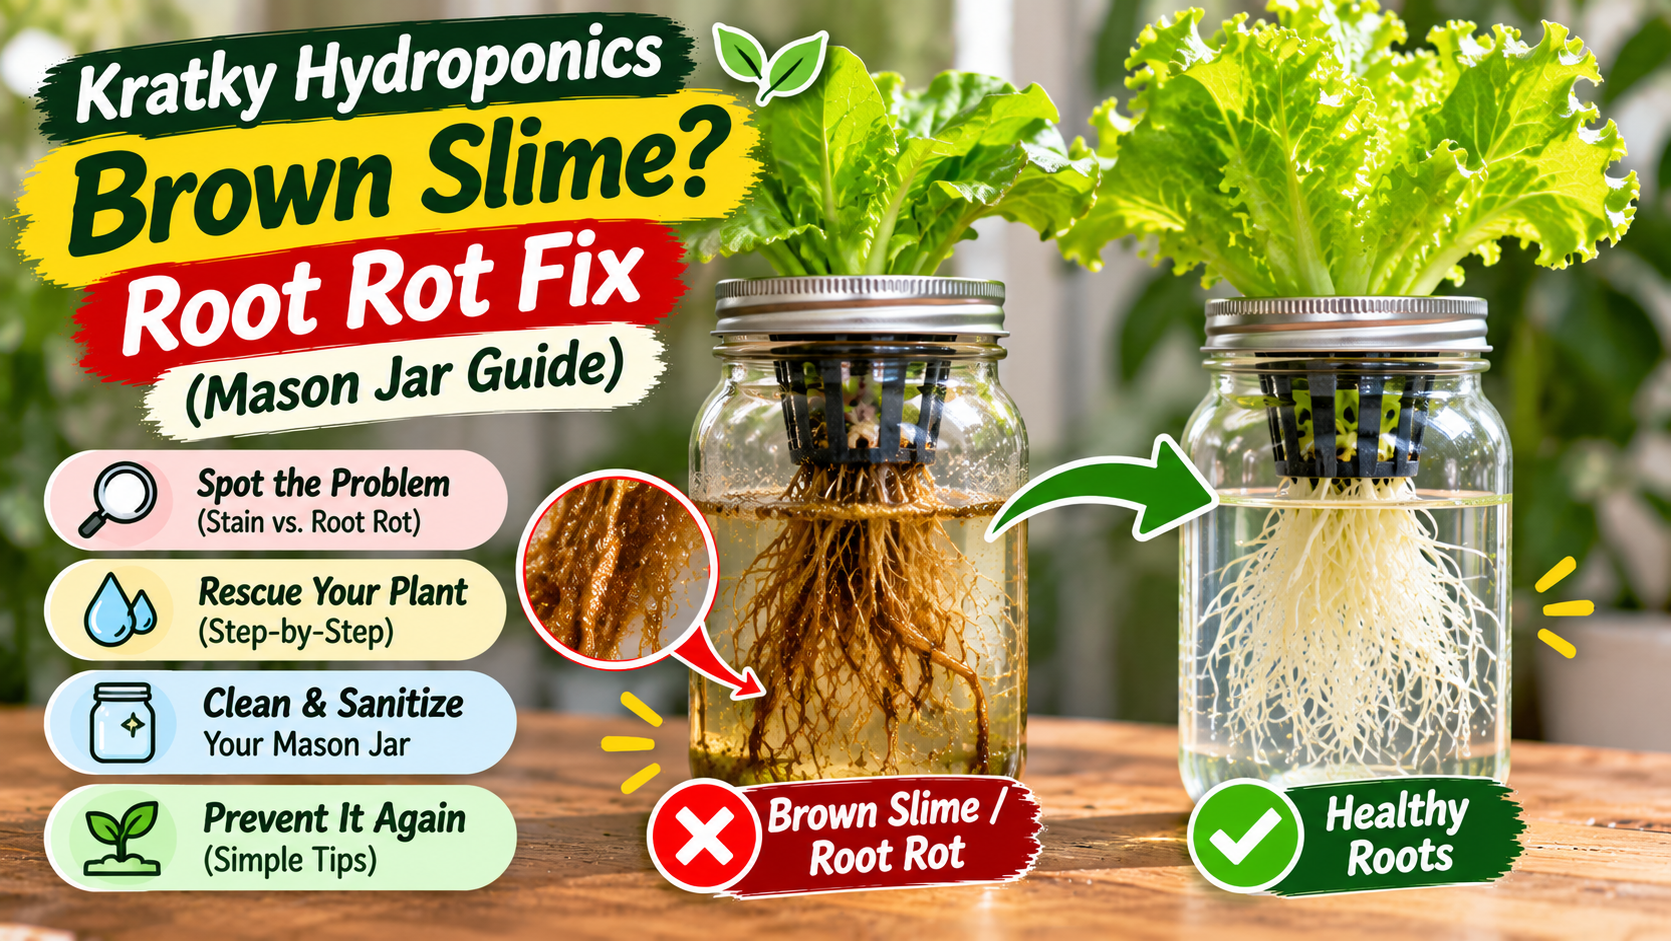
Kratky Hydroponics Root Rot: Fix Brown Slime in Jars
Kratky Hydroponics: Brown Slime on Roots? How to Fix Root Rot in a Mason Jar
Found brown, slippery roots or a strange smell in your mason jar hydroponics setup? It may be algae, nutrient staining, or root rot. Learn how to tell the difference, rescue healthy roots, clean the jar, and restore the air gap that makes the Kratky method work.
1. Brown staining or root rot? How to tell the difference
Hydroponic roots do not always stay bright white. Nutrient colour, organic particles, algae, and biofilm can tint the roots or jar. The texture and smell are more useful clues than colour alone.
More likely to be staining
- Roots are cream, tan, or lightly brown.
- They remain firm and flexible.
- There is no rotten or sour smell.
- The plant is still growing normally.
Possible root rot
- Roots are soft, mushy, or slippery.
- Outer root tissue may slide off when gently touched.
- The solution smells foul or swampy.
- The plant wilts, yellows, or stops growing.
Hydroponic root diseases, including Pythium-related root rot, can cause brown or grey discoloration, root decay, sparse root growth, and wilting. The same symptoms can have several causes, so do not assume you can identify a specific pathogen just by looking at the jar. Colorado State University Extension explains common root-disease symptoms and the importance of clean systems and adequate oxygen. A 2025 diagnostic guide also describes the range of symptoms associated with Pythium in hydroponic leafy greens and herbs.
2. Why does brown slime appear in a Kratky mason jar?
Light entering the jar can encourage algae
Clear glass looks attractive, but light reaching nutrient solution can encourage algae. Algae can form a slippery film on the inside of the jar, lid, or net cup. A green film is a strong clue that light is reaching the reservoir. Cover the jar so the roots and nutrient solution are shaded while the leaves remain exposed to light. UF/IFAS recommends a lightproof container or covering for Kratky systems. Read the UF/IFAS Kratky guide.
The air gap may have disappeared
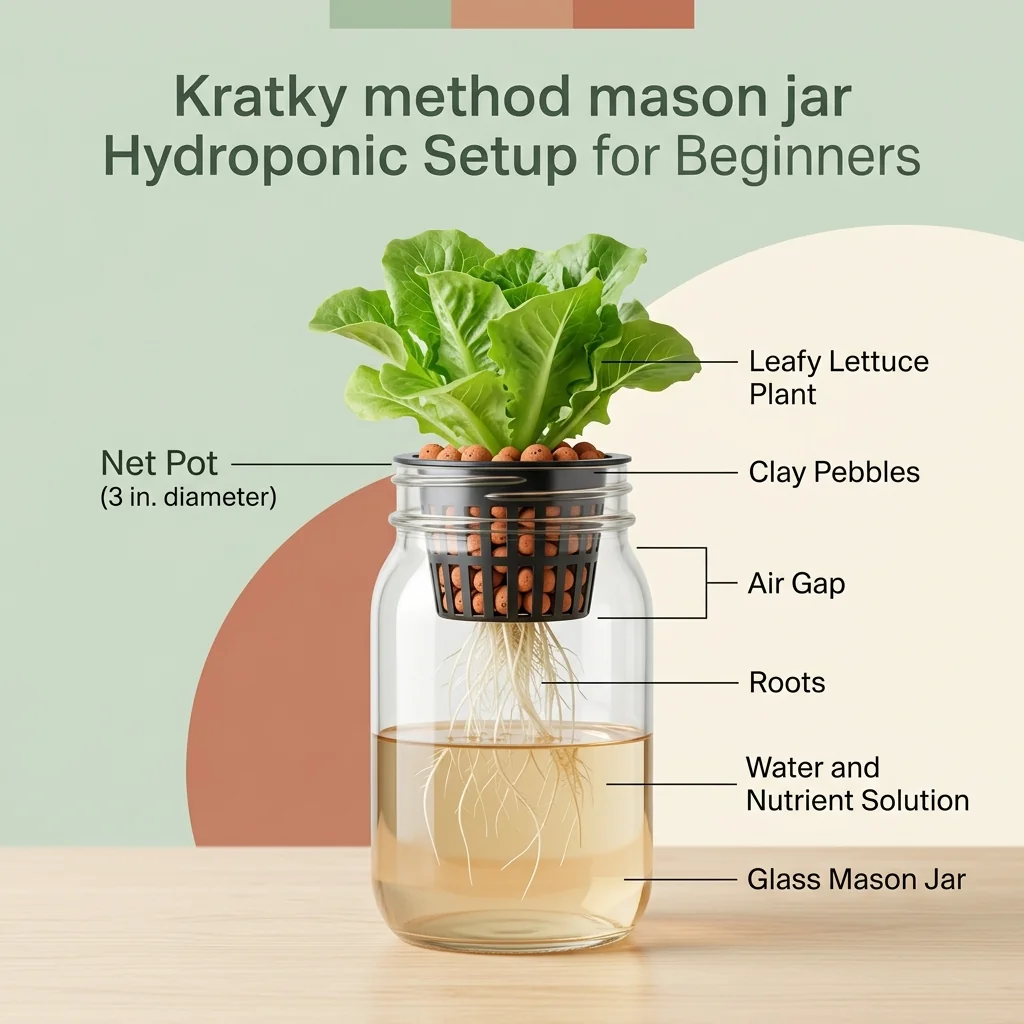
The Kratky method is passive: as the plant drinks, the solution level drops and creates an air gap. The roots that develop in this humid space can take up oxygen. If you keep topping the jar up to the lid or net cup, you can submerge too much of the root system and remove that air space. The University of Minnesota Extension advises keeping the net pot partly above the solution and, as roots develop, leaving a substantial portion of roots exposed to the air gap. See its passive-aeration guidance.
Warm, stagnant solution and decaying debris
Hot windowsills, dead leaves left in the jar, dirty transplant plugs, and reused equipment that has not been cleaned can all add stress or introduce microbes. A small, still reservoir has little tolerance for neglect. Keep the jar away from strong heat and remove dead plant material promptly. Low oxygen in nutrient solution favours root disease, according to Colorado State University Extension.
3. Fast fix: how to rescue a Kratky plant with brown, slimy roots
Act promptly, but be gentle. The aim is to remove decaying material, reduce contamination, and correct the conditions that stressed the roots. A severely damaged plant may not recover.
- Remove the plant and inspect it. Lift the net cup out carefully. Separate healthy, firm roots from sections that are mushy, blackened, or falling apart. If the crown or stem base is rotten, or almost the entire root system has disintegrated, discard the plant rather than returning it to the jar.
- Discard the old nutrient solution. Do not pour the slimy or foul-smelling solution back into the cleaned jar or reuse it for another plant. Empty it into an appropriate drain or disposal route, away from other hydroponic reservoirs.
- Rinse the roots gently. Use clean, cool, potable water to wash away loose slime and debris. Avoid scrubbing or pulling firmly on healthy roots, because damaged roots are easier to infect.
- Trim only dead or mushy sections. Use clean, sharp scissors that have been disinfected and rinsed. Keep firm, healthy roots wherever possible. If rot extends into the crown, the cutting may not be salvageable.
- Wash and sanitize the jar and equipment. Clean the jar, lid, net cup, and reusable supports with detergent and a bottle brush to remove film and debris. Then use a food-contact or horticultural disinfectant according to its label, rinse as directed, and allow the items to dry. Never mix bleach with acids, ammonia, vinegar, or other cleaners.
- Mix a fresh nutrient solution. Use clean water and the hydroponic nutrient product at the rate specified for your crop and system. Do not compensate by adding extra fertilizer. If you monitor pH or EC, measure the fresh solution rather than guessing.
- Rebuild the air gap. At the seedling stage, the solution may need to touch the bottom of the net cup or growing medium so roots can reach moisture. Once roots extend into the jar, allow the level to fall so some roots remain in the humid air space. Do not refill the jar to the original level and drown those air-exposed roots.
- Block light and move the jar away from heat. Fit an opaque sleeve around the glass, keep the lid area shaded, and choose a location with suitable light for the leaves but without strong direct heat on the reservoir.
4. Set the water level correctly for the Kratky method
A mason jar Kratky system does not work like a conventional aerated deep-water culture bucket. It relies on the changing solution level to create an oxygen-rich space above the liquid.
- At transplant: Keep the bottom of the net pot or starter medium in contact with the nutrient solution so young roots can reach it.
- After roots develop: Let the solution level drop naturally. Roots should have access to both nutrient solution and the moist air gap.
- Avoid repeated full top-ups: Filling the jar back to the net pot can submerge the roots that had adapted to the air gap.
- Do not let all roots dry out: The lower roots still need access to the solution. If the jar is nearly empty before harvest, assess the crop and add only enough solution to maintain the intended root-zone arrangement.
Exact water levels depend on jar size, net-pot depth, crop, and growth stage. There is no single fill line that works for every mason jar. The University of Minnesota Extension explains passive aeration and why part of the root system needs access to air.

5. Make a clear mason jar lightproof without blocking the plant
You can keep the leaves in the light while shielding the nutrient solution and roots. Try one of these simple covers:
Removable dark sleeve
Slide a dark fabric, neoprene, or opaque paper sleeve around the jar. It can be removed briefly to inspect the water level.
Foil wrap
Wrap the outside of the jar with aluminium foil and secure it so light cannot enter around the sides.
Opaque jar cover
Use a purpose-made dark cover or an opaque container suitable for food-growing use.
Check the lid opening
Cover gaps around the net pot and growing medium so light does not shine directly into the solution.
UF/IFAS recommends a lightproof container to limit algae in a Kratky setup. Its guide shows the basic arrangement.
6. How to prevent brown slime and root rot next time
- Start with clean equipment. Wash and sanitize the jar, lid, net cup, and reusable growing media between crops.
- Exclude light from the reservoir. Keep the jar opaque, including around the lid and net pot.
- Preserve the air gap. Do not continually refill the jar to the top once roots have grown into the air space.
- Use a suitable crop and jar size. Kratky jars are most convenient for compact, relatively short-cycle crops such as lettuce and herbs. Large or long-season fruiting plants usually need a larger, better-managed system. New Mexico State University Extension discusses the limitations of small passive systems.
- Keep debris out. Remove dead leaves and pieces of starter medium that fall into the nutrient solution.
- Avoid hot spots. Do not leave the jar in intense direct sunlight where the solution can heat up rapidly.
- Follow nutrient directions. Mix nutrients for the crop and water volume. Stronger is not automatically better.
- Inspect regularly. Check the smell, water clarity, root firmness, and plant growth. Catching a problem early is easier than rescuing a fully rotted root system.
7. Kratky mason jar troubleshooting table
| What you notice | Possible reason | What to do |
|---|---|---|
| Roots are tan but firm, no bad smell | Nutrient staining or normal discoloration | Monitor texture, smell, and plant growth. Do not cut healthy roots just because they are not pure white. |
| Green film on glass | Light entering the nutrient solution; algae growth | Empty and clean as needed, then make the jar and lid lightproof. |
| Brown, slippery roots and foul smell | Root decay or microbial growth | Remove plant, discard solution, trim dead roots, clean equipment, and correct the air gap. |
| Plant wilts while jar is full | Root damage, poor oxygen access, heat, or nutrient stress | Inspect roots and solution; check the air gap, temperature, and nutrient mixing. |
| Water is cloudy with sediment | Debris, algae, precipitated nutrients, or microbial growth | Check for odor and root texture. Remove debris and reset the jar if there are signs of decay. |
8. Frequently asked questions
Are brown roots always a sign of root rot in Kratky hydroponics?
Can I save a plant with brown, slimy roots?
Should I add an air stone to a Kratky mason jar?
Why is my mason jar hydroponic water green?
Can I top up the nutrient solution in a Kratky jar?
Can root rot spread to another mason jar?
Does a Kratky jar need a pump?
More practical growing guides
Explore more indoor gardening, hydroponics, composting, and sustainable-living tips on Before We Sleep.
Visit Before We SleepSources and further reading
- UF/IFAS Extension – Kratky Hydroponic Method
- University of Minnesota Extension – Small-Scale Hydroponics
- Colorado State University Extension – Root Disease Problems in Hydroponic Systems
- Plant Health Progress – Diagnostic Guide for Pythium Root Rot in Hydroponic Leafy Greens and Herbs (2025)
- New Mexico State University Extension – Hydroponics: Water-Saving Farming