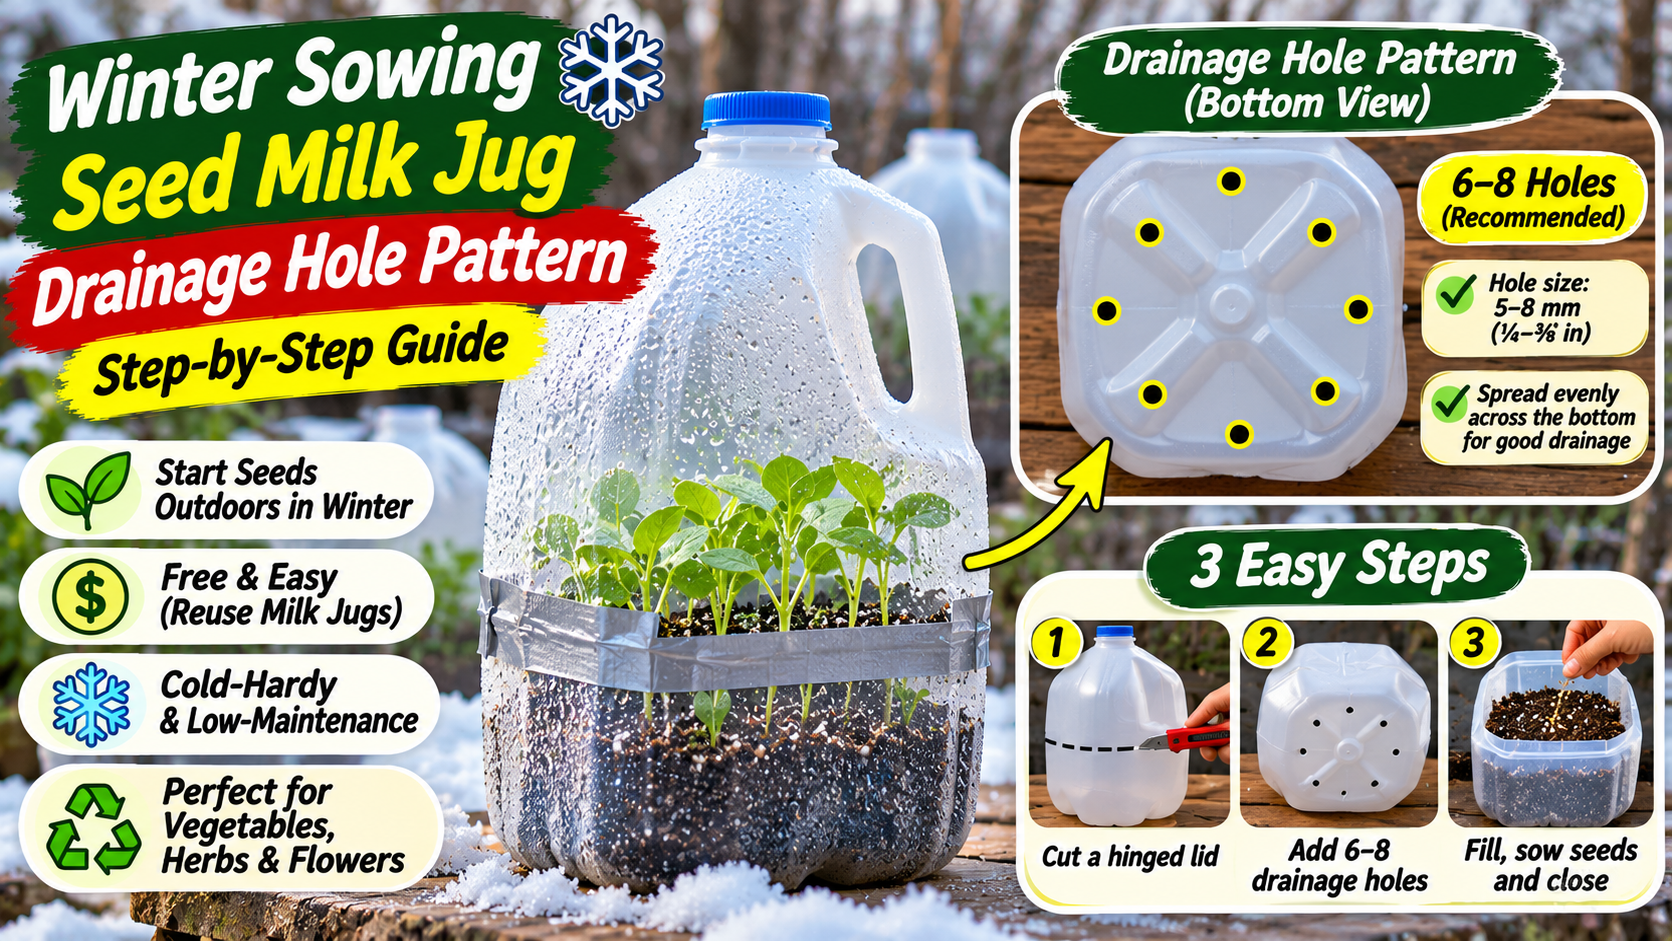
Winter Sowing Milk Jug Drainage Holes: Best Pattern
Winter Sowing Seed Milk Jug Drainage Hole Pattern: How Many Holes Do You Need?
A recycled milk jug can become a mini outdoor greenhouse for starting hardy seeds. The trick is balancing drainage, rain entry and airflow. This guide shows a simple hole pattern, where to place each opening, and how to avoid soggy seed-starting mix.
The simple 1-gallon jug pattern
For a typical clear or translucent 1-gallon milk jug, begin with 6–8 small drainage holes in the base, spaced around the bottom so excess water can escape. Leave the screw cap off to provide an opening for rain and air.
- Base: 6–8 small holes, evenly distributed.
- Top: remove the cap; extra top holes are usually unnecessary.
- Soil: about 3–4 inches of pre-moistened seed-starting mix.
Why the pattern matters: winter-sown containers sit outdoors through rain, snow or seasonal weather. Water needs a way out, but seeds also need steady moisture and oxygen. Too few or blocked holes can leave the mix waterlogged; too many large holes can let the mix dry too quickly or wash out.
1. The best drainage hole pattern for a milk jug
There is no single official hole layout used by every gardening extension program. Recommendations vary with container size and design: University of Maryland Extension suggests 4–6 bottom holes, Ohio State University Extension suggests roughly 5–10, and a Wisconsin technical-college guide describes 5–6. A practical middle ground for a standard gallon jug is 6–8 small, evenly spaced holes.
Schematic only: place 6–8 small holes around the low points of the jug base. The exact positions depend on the molded shape of your container.
Hole size and placement
- Make small holes roughly 3–6 mm (⅛–¼ inch) wide. The aim is free drainage without letting much potting mix escape.
- Distribute the holes around the base rather than drilling them all in the center.
- On a jug with molded feet or recessed channels, put holes at the lowest points where water can collect.
- Clear plastic burrs and loose fragments from inside the jug before adding mix.
2. Do you need holes in the top of the jug?
For the common hinged milk-jug method, remove the screw cap. The open neck lets rain enter and provides ventilation. Penn State Extension specifically describes discarding the cap so rain and melting snow can keep the mix moist.
If you are using a different container with a fully closed lid—such as a food-storage box—make several small ventilation and water-entry holes in the lid as well as drainage holes underneath. A milk jug with its cap removed normally does not need extra shoulder holes to function.
3. Materials for winter sowing in a milk jug
Container and tools
- Clean, translucent 1-gallon milk jug
- Scissors or craft knife
- Drill with a small bit or hole punch
- Duct tape or weather-resistant tape
- Waterproof marker and plant label
Growing supplies
- Seed-starting mix or light potting mix
- Seeds suited to winter sowing
- Water for pre-moistening the mix
- Plant labels and a tray for carrying
4. Step-by-step: prepare the milk jug
- Wash the jug. Rinse out all milk residue with warm soapy water, then rinse well. Let excess water drain.
- Make the drainage pattern. Before cutting the jug, turn it upside down and make 6–8 small holes across the base. Work on a stable surface and keep your hands away from the tool path.
- Cut a hinged opening. Cut around the jug below the handle, leaving a short uncut section as a hinge. Cut away from your body. The lower section should hold roughly 3–4 inches of mix.
- Add pre-moistened mix. Fill the base with about 3–4 inches of seed-starting mix. Moisten it before sowing; it should feel damp, not saturated or muddy.
- Sow and label. Follow the seed packet for sowing depth and spacing. Label both the jug and an internal plant marker so the identity remains clear if the outside label fades.
- Close, but ventilate. Fold the top back into place and secure the cut seam with tape. Remove the screw cap. The jug should remain able to admit rain and exchange air.
- Set it outdoors. Place the jug outside in a sheltered position where it receives natural seasonal conditions and cannot blow over. Check moisture periodically.
5. Which seeds are suitable?
Winter sowing is most useful for hardy perennials, native plants and cool-season annuals that can tolerate outdoor temperature changes. It is not a shortcut for every seed. Tender warm-season crops such as tomatoes, peppers and cucumbers are generally sown later, when conditions suit their germination.
| Seed group | Winter-sowing suitability | What to check |
|---|---|---|
| Hardy perennial flowers | Often a good choice | Check whether the species benefits from cold stratification. |
| Native wildflowers | Often suitable | Follow species-specific instructions and local native-plant advice. |
| Cool-season vegetables | Can work in late winter | Time sowing for the local growing season. |
| Tender warm-season vegetables | Usually not for midwinter outdoor sowing | Wait for suitable temperatures and seed-packet timing. |
6. Common drainage and ventilation problems
| Problem | Likely cause | What to do |
|---|---|---|
| Water stands in the bottom | Too few holes, blocked holes or a low molded recess | Clear the holes and add a small hole at the lowest pooled area. |
| Mix dries out quickly | Holes are too large, the jug is exposed to wind or the container is in a hot position | Move it to a more sheltered spot and check moisture more often. |
| Green algae appears | Excess moisture and light on the growing medium | Check drainage and avoid keeping the mix saturated. |
| Fuzzy growth or musty smell | Stale, overly wet conditions or poor airflow | Improve ventilation, remove badly affected material and reassess moisture. |
| Seeds wash to one side | Heavy watering from above or large openings | Pre-moisten the mix and water gently when needed. |
7. Safety tips when making holes
- Use a drill or hand hole-punch on a stable work surface; keep the jug supported.
- If using a heated tool, work outdoors or in an appropriately ventilated workspace and avoid breathing plastic fumes.
- Wear eye protection and cut away from your hands and body.
- Do not use a jug that previously contained hazardous chemicals.
- Keep sharp tools away from children and pets.
Frequently asked questions
How many drainage holes should a winter sowing milk jug have?
A practical starting pattern is 6–8 small holes evenly spread across the base of a standard 1-gallon jug. Extension recommendations vary by container and include patterns from about 4 to 10 holes.
How big should the holes be?
Small openings around 3–6 mm (⅛–¼ inch) are a useful starting point. Check that water drains freely and that the potting mix does not wash out.
Should I drill holes in the milk jug lid?
For the usual milk-jug method, remove the screw cap. The open neck admits rain and allows air exchange. Other lidded containers may need ventilation holes in the lid.
Can I use a clear water jug instead?
Yes, if it is clean, translucent, large enough to hold several inches of mix and can be modified to provide drainage, ventilation and a way to open it.
Can I winter sow seeds in a warm climate?
The classic method relies on natural outdoor seasonal temperatures. In a climate without a cold season, follow the seed packet and local sowing calendar; a jug can still act as a ventilated mini-greenhouse, but it may not provide the chilling conditions some seeds need.
When should I open the jug in spring?
Monitor it as temperatures rise. Open or remove the top gradually when seedlings emerge and warm sunny days risk overheating the container. Protect young seedlings if a late freeze is forecast.
Final thoughts
A good winter-sowing milk jug does not need a complicated drainage system. Start with 6–8 small holes spread across the base, remove the cap for rain and ventilation, and use a light, pre-moistened seed-starting mix. Check the jug periodically so it stays damp but never waterlogged.
The exact pattern may need a small adjustment for the shape of your jug and the conditions where it sits. A quick drainage test before sowing is the easiest way to confirm that your container is ready.
Sources and further reading
- Penn State Extension — Starting Seeds in Winter
- University of Maryland Extension — Winter Sowing in Jugs
- Ohio State University Extension — Winter Sowing
- NC State Cooperative Extension — Winter Seed Sowing in Milk Jugs
- Cornell Cooperative Extension — Winter Sowing 101
This article is for general gardening education. Seed timing and winter-sowing suitability depend on plant species and local climate.